How To Paint Your Home Interior
 Being in the military has advantages like living in different places and going on new adventures all over the world. My husband and I have always had in the back of our minds that we would buy a place if we got stationed in a city that we thought would be a good investment or in a place we wouldn’t mind returning to one day. A short while ago, we took the leap and finally decided that we would buy a home while stationed here at Fort Stewart.
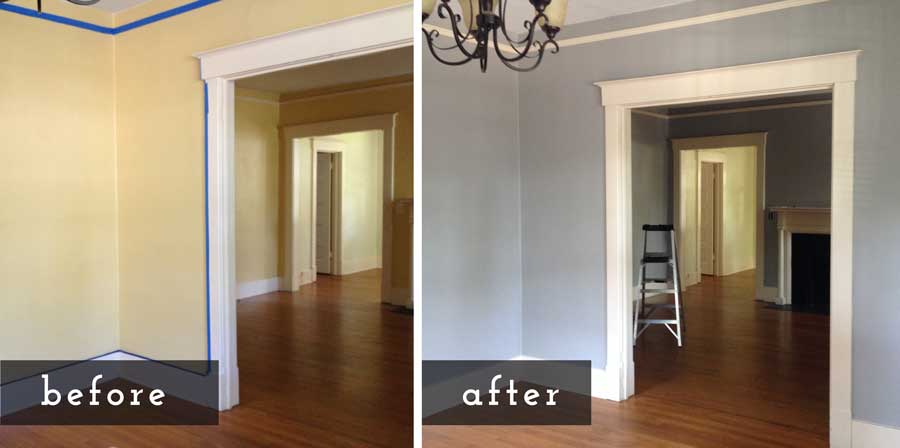
When we bought the house, I got excited that I could really make this new house our home by putting my own stamp on the property and painting the walls. I know you can paint when you are in a rental, but it always seemed like a waste of time and money for me, not to mention I have never really painted anything. This was my first time painting the interior of a home. Luckily, I had the help from two of my family members who are experienced painters. I had some mishaps along the way, but if you are thinking about painting the interior of your home soon, here are some tips that will help you.
Planning
-
Plan when you would like to paint. Ideally, the best time is when your house is empty. If you paint before your household goods arrive then you don’t have to work around a bunch of stuff or worry about getting paint on the furniture.
-
Recruit a buddy to help. If you have a friend working with you, then the job seems to go more quickly. Plus it helps to have an extra set of eyes just in case you missed a spot.
-
One of the hardest parts of my planning process was picking out a good color. I knew that I wanted a blue-gray color, but the choices were overwhelming. Having my mom and godmother there to give their opinions really helped. Decide early on what color you would like and get a few small paint can samples to paint on the wall. This helps you to see what it would look on a larger scale than just those small paper samples that you get from the store.
Supplies
After talking to my husband and my mom, I soon learned that there are a few essentials that you need when painting the inside of your home. Here is my shopping list, but if you have any questions always ask a store associate for assistance. Remember that you can get a military discount at stores like Lowe’s and Home Depot or check out ACE Hardware on PopNod.com for discounts.Roller brush


-
Roller cover (Fluffier is not always better. Get one that will be good for the surface you are painting.)
-
Roller extension (If you are short like me and have tall walls/ceilings you will need this.)
-
Medium-size paintbrush (This is for trimming out the wall area and for places a roller can’t get to.)
-
Drop cloths (So that paint doesn’t get on your floor.)
-
Rolling pan (Make sure your roller brush and cover can fit into this pan.)
-
Rolling pan liner (If you plan on using your pan multiple times.)
-
Small paint tray (To use when trimming out your room. You can also use any plastic container for this as well. I repurposed a yogurt container.)
-
Small sponge paint trimmer (These are wonderful tools to help newbies like me trim out the walls and windows so I could carefully get into areas the roller wouldn’t reach.)
-
Flat-head screwdriver or a paint can opening tool
-
Painter’s tape (Get good painter’s tape. I first used dollar store tape and learned the hard way when I returned the next morning and all the tape was on the ground.)
-
Ladder (For higher areas that you can’t reach on foot.)
-
Damp cloth rags or old washcloths (These have a variety of uses like washing down walls or cleaning up drips and spills.)
Steps
After you get your supplies then you are ready to get the job done. To help with your paint assault on your walls, here are some steps that you can take to make sure the job gets done quickly and effectively.
-
Wipe down all of the area you plan on painting with a damp cloth. This helps remove any dirt, grime, or dust that may have accumulated on your paint surface. Let the area dry 2-3 hours or overnight before painting. My mom advised washing walls with just warm water and a dash of soap.
-
Remove all outlet and light switch covers. Place all covers and screws into plastic sandwich bags and use a permanent marker to write the location, just in case the covers are slightly different.
-
Tape areas you do not wish to paint like moldings, door frames, or the ceiling (if it is a flat surface). Like I said earlier, I learned my lesson after buying cheap painter’s tape. If you have good painter’s tape it is less likely to allow paint seepage through to the surfaces you don’t want to have painted. If paint does get past the tape, use your cloth rag to help clean up the mess. If you are not sure, you can test your tape by painting a small area near your tape. Once dry, remove the tape to see if there is any paint leaking through and to see if the tape is going to pull up paint from surfaces.
-
Place your drop cloths on the floor under the areas you plan on painting. Make sure your paint and supplies stay on the cloths when painting to avoid getting paint everywhere.
-
Depending on the base color, you may have to apply a primer to the area before applying your final color. The darker the existing paint color, the more likely you will need a primer, or that you will need to apply multiple coats of paint if you are applying a lighter color to your walls.
-
If you don’t have to apply a primer, then you can begin by trimming out the area you wish to paint. This will be the most time consuming step, but totally worth it. For our house, the windows, picture molding, and baseboards needed to be trimmed out. If you have multiple people helping you, this step goes by more quickly. Since I was the youngest in my group of painters, I was on ladder duty trimming and painting the higher areas. My mom had a stress fracture in her foot, so she was on baseboard duty. Because people are painting in several areas this is where the small plastic containers come in handy. Pour your paint into the plastic containers so that you don’t have to go up and down the ladder or across the room for your paint. You can use your medium paintbrush to trim out the area if you have a steady hand or you can use your sponge roller. If you are using the roller, then you may want a small paint tray. That way you don’t get too much on your sponge. Also when using the sponge, don’t get paint on its small wheels or you will be cleaning a lot more than you wanted.
-
Once the room or wall is trimmed out, you can begin rolling paint onto the walls. Fill the bottom part of your rolling pan with your paint. Don’t fill the entire tray. You want room to lightly dip the roller into the paint and roll it on the slanted surface for the paint to cover the roller before applying the paint to the wall. To get the most even coat of paint on the walls, make sure you apply the same pressure when rolling. Also make sure you make long and even strokes when applying your paint. If you accidentally get paint on the ceiling (or on molding that is high up) a trick my godmother showed me is to put your damp cloth on the handle portion of your roller and wipe any paint that you need to remove. Be careful not to roll your clothes or face when doing this. Believe me it can happen.
-
Next step is to remove the tape to see if there are areas that you need to touch up that are showing the previous wall paint color. Either use your paintbrush or the rolling paint sponge to apply paint where it is needed. On the other hand, after you remove the tape and find areas where the paint leaked under the tape you will need to use your damp cloth to wipe away the excess paint. An extra pair of eyes helps to find these issues as well.
-
When all areas have been touched up, look to see if you need to apply another coat of paint. This may mean waiting an hour or so for the paint to fully dry.
-
The last step is also important step – cleaning up. To help ensure that the tools you used can be used again you will want to take time to make sure they are cleaned well. For extra advice on cleaning, make sure you ask your paint supplier for the best ways to clean the paint you are purchasing. Luckily for me the paint I was using was water-based. Here are the steps I learned from my godmother on how to properly clean my brushes.
-
Run your medium brush, roller, and sponge under water or soak in a tub of water.
-
For your medium brush, to make sure water fully penetrates the bristles, place your hand at the end of the brush, bending them back and forth. Then grab the ends in one hand and twist back and forth. Do this until the majority of the paint has been removed from your brush or the water running through your brush is pretty clear and doesn’t contain your paint color.
-
For your roller and rolling sponge, keep washing water over the surfaces containing paint until all the paint has been removed. It is best to do this as soon as you are done with these items so that the paint doesn’t have time to dry on them.
-
Once washed, set everything out to dry. After your medium brush is dry, there is one more step. Take a small wire brush and go through the paintbrush with the bristles.
-
If you have any leftover paint in your plastic containers, pour it into the original paint can. Don’t scrap the dried paint from the plastic containers into the paint can.
-
After all the paint is back into the original paint can, you can store your paint for later uses. Store it in an area that doesn’t have extreme fluctuations in temperatures. This helps it from becoming lumpy.
Hopefully these tips will help you make your house feel more like your home. After completing this project, I was so proud. I loved putting my personal touch on my new home.


Have you painted your house before? Do you have any funny stores or tips that you would like to share? If so, please share them in the comments section below.

